It’s now mid 2010. A quick search shows I have been taking photographs with digital cameras since 2005. I was actually a late starter, but still have lots and lots of JPG and NEF image files.
There comes a time when you have to move them off your hard drive to free up space. This is called archiving. For my purposes this is different from backing up, which means taking a copy onto an external media, but leaving the original on the hard drive. Archiving means deleting them off the hard disk, once they are safely on your external media (like a DVD).
It’s a 4 step process:
- Copy them to the external media, usually a DVD
- Index them, including creating thumbnail (small) images of them, enabling you to still ‘browse’ them without having to hunt down your archive DVDs
- Create a 2nd copy of your archive DVDs (for taking off-site, see later)
- Delete the original files from your hard drive
I archive by year. In fact the photos on my hard drive are arranged by year too; I have top-level folders 2010, 2009, 2008.
1. Copying them
Just use your standard DVD creation software. You are creating a Data DVD (not a Movie one!). I use the free ImgBurn software. Important point: give each DVD a sensible, unique Volume Label. For my 2009 archiving it took three DVDs. So I gave them Volume Labels of DS.photos.2009.1 DS.photos.2009.2 and DS.photos.2009.3
After the files have been burnt, write the Volume Label on the DVD itself.
Verify the burning worked, by browsing a number of folders on your new archive DVD.
2. Index the DVDs
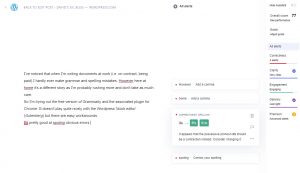
I’m trying out the free vvvP (virtual volumes view, Photo edition). Here’s a screen capture after I have catalogued 4 archive DVDs. Note the Volume Labels, which expand out to show you the Folders and the thumbnail images (even after the DVD has been removed – nice!)

3. Create a 2nd copy of your archive DVDs
It’s an ancient technique but well worth it. Create a 2nd copy of your archive DVDs, label them the “B” copies (DS.photos.2009.1_B) and next time you visit the folks or your siblings etc, ask them to store them for you. This is ‘off site’ archiving. Hence if something really bad happens at your place – and your own archives are destroyed – you have a spare copy.
And get them to do the same with their archives and you as their off-site place.
4. Delete the original image files off your hard disk
When you have done all the above – including checking all images etc were burnt to your archive DVDs – then you can delete your images files off your hard disk. You may want to use a duplicate file finder to verify each folder was archived. The wonderful Lifehacker web site suggests the aptly named Easy Duplicate Finder. I haven’t tried it, but I guess you get it to check for duplicate files on your archive DVD and your photo’s folder on the hard drive…in this case a duplicate is a GOOD thing, if you know what I mean.